


Create a website with stunning animations using Three Js
We can create a whole world inside web by using three Js web framework


Website Sample Video
Introduction
Web development has come a long way from using just HTM and CSS in our webpages. Now-a-days, the most visually stunning and amazing websites are created using Java Script open libraries such as three.js, p5.js, anime.js, fullpage.js(smooth page transitions) etc..
We will look go deep into some of these libraires and learn how they work and how to develop websites with these libraries. Please watch the video above to see how anime Js and three Js makes a website special.
Three Js
Basics
Three Js is an amazing and powerful library created by Mr. Doob. It is a Java Script API for creating 2D and 3D animations on your website. I was really amazed when using the library for the first time as it does not require any external dependencies or plugins, but can make wonders in website. It is build upon WebGl which is built from OpenGL(a graphics API used in computers ) for using 3d and 2d animations in web. Three Js simplifies WebGl very much and open the doors to a 3D world !
The three.js library can be installed using npm,
npm i three
Then we can import the library and just let your imaginations flow. Three Js has an amazing documentations and they have a large collection of examples which makes me nerves dance on excitement. Refer the examples here.
//index.js
import * as THREE from 'three'
Three Js renders all the scenes in a canvas element in html. Therefore, just create a canvas element with a id in your html code,
//index.html
        <canvas id='bg'></canvas>
Components
Scene
The scene is the basic background like a board where you can draw or create any 2D or 3D animations. Where element created must be added to the scene, so that it can be rendered to the web page. We can create a scene with just a line of code.
const scene = new THREE.Scene()
Camera
As we are dealing with 3D object, the concept called perspective come into play, as the angle in which we see the image determines the shape and size of a 3D image. There are many types of cameras but the most easy to use is Perspective camera.
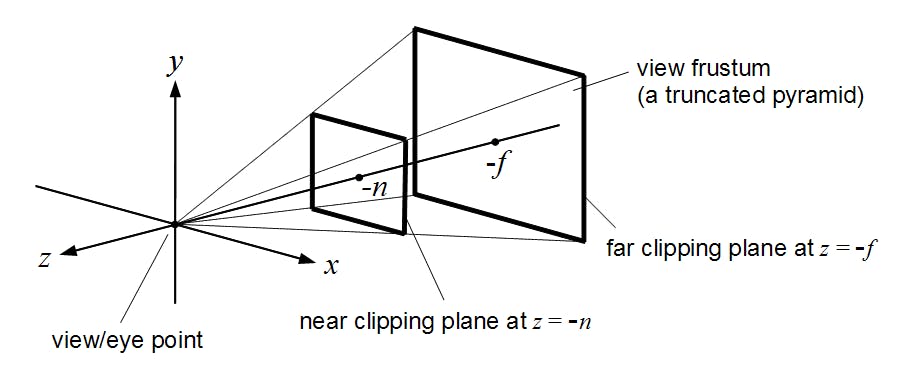 The concept of this camera is like viewing a image from a telescope.
const camera = new THREE.PerspectiveCamera( 45, window.innerWidth / window.innerHeight, 10, 2000 );
camera.position.setX(0); //similarly there is setY and setZ  functions for fixing the camera position
Then set the location of where to render your scene(canvas element) and add the renderer to the document object.
Tip: Set the antialias property to true to get more smooth animations.
const renderer = new THREE.WebGLRenderer({antialias: true,
canvas: document.querySelector('#bg')
});
renderer.setSize( window.innerWidth, window.innerHeight );
document.body.appendChild( renderer.domElement );
Geometry
Three Js provides many shapes called geometry which can have it's own texture and unique properties. Geometry are just shapes that have no outer surface and can't reflect light i.e.. they can't be seen unless supported by a material. There are many geometries in Three Js. I have the geometry called torus in the project as the rotating hole in the center.
const geomentry =new THREE.TorusGeometry(25,4,26,29,10)
// syntax TorusGeometry(radius : Float, tube : Float, radialSegments : Integer, tubularSegments : Integer, arc : Float)
Material and Mesh
Materials describe the appearance of geometry. They determine how much light is absorbed and reflected and how your object will look. Mesh is used to combine a geometry to a material and used to render the object on screen. There are also many meshes, I have used a mesh which is good for shinny object called MeshPhongMaterial.
const material=new THREE.MeshPhongMaterial({color: 0x393737 ,emissive: 0x150306,transparent:true,shininess:10});
const torus=new THREE.Mesh(geomentry,material);
scene.add(torus);
The emissive property makes the color provided, unaffected to the color of light from the camera.
Animations
This is the exhilarating part of 3D object. To make animation just create a function called Animate() and call the function at the end. Inside the function use the requestAnimationFrame() recursive call to render the animation on scene. Then just change the properties of torus object to show a rotation effect.
function animate() {
    requestAnimationFrame(animate)
    torus.rotation.y+=0.02;
  torus.rotation.z+=13;
  torus.rotation.x-=0.01;
}
animate();
Anime Js
Anime Js is also another amazing library to make smooth 2D transition to yout website . The sudden appearance of button and floating of button and text was made by this library. Just install this library with npm and import it.
npm i animejs
Then create a button in your index.html with id="fly". Then use this function the make the effect made by the first button,
import anime from 'animejs'
anime({
        targets: '.fly',
        translateY: function(el, i) {
          return 50 + (-50 * i);
        },
        translateX:function(el, i) {
          return 500 + (-50 * i);
        },
        scale: function(el, i, l) {
          return (1 - i) + 0.5;
        },
        duration: function() { return anime.random(1200, 1800); },
        delay: function() { return anime.random(0, 400); },
        direction: 'alternate',
        loop: false
      });
Finishing Thoughts
Explore these libraries and create a project to experience the fun of building 3D websites and share your story. I am excited to read about the next amazing 3D website going to be build be the readers of this article.
Project Links
Please refer to the project on Github for any doubts and clarifications or connect with me on any social platforms.