

Take easy surveys with a flutter mobile app
A flutter mobile app with an amazing UI, incorporated with firebase for authentication and storing survey results


Flutter
Flutter is an open-source software development kit(SDK) which can be used to develop cross-platform apps. Flutter uses the dart programming language which is similar to java in syntax. It mostly creates UI in a tree like structure stacked with designed elements called widgets. You can check more about flutter in here
Why survey in mobile apps
Mobile phones are convenient and used by the majority of people on earth. A study in 2021 shows the 90% number of people accessing the web are using mobile phones to access the web.
Survey are best, when we collect a large amount of data from different kind of users. Therefore a survey app build with SDK like flutter which allows us to create amazing UI easily is more preferred to reach more people around the globe.
App overview
Flutter uses widgets to create the UI framework of the mobile app. The widgets may be stateful or stateless,
- stateful -> content of a page changes frequently or has a possibility of change
- stateless -> content of page doesn't change.
The basic flow is for a survey taker is,
Dashboard -> Take Survey -> Display Results
The basic flow for a admin is,
Dashboard -> Login Screen -> See all the results of surveys
The app also uses a timer for each question with a progress bar animation. It also include a animation where the user can automatically move to the next question after answering.
The firebase database is mostly used with flutter apps to store data and is also used for authentication of user during login. It is easy to integrate your flutter app with firebase. The admin credential and the result of each survey is stored in firebase.
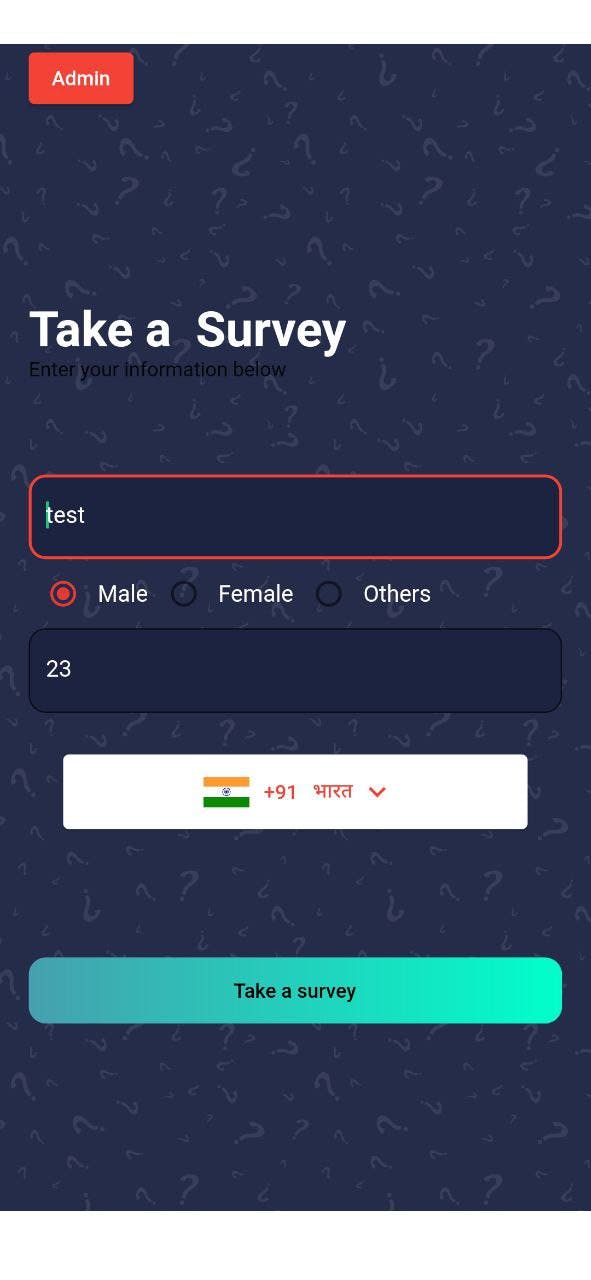
Dashboard
The dashboard uses a stateful widget and has details like name, age, gender and country. Let's go deep and understand how to implement this in a app.
Stateful Widget
A stateful widget in flutter is created by extending the StatefulWidget class.
Note: The _ denotes a private variable.
class Dashboard extends StatefulWidget {
  Dashboard({Key? key}) : super(key: key);
  @override
  _Dashboard createState() => _Dashboard();
}
The code below is the main class where we can write our design code inside the build(BuildContext) method.
class _Dashboard extends State<Dashboard> {
 @override
  Widget build(BuildContext context) {
          }
}
Scaffold Widget
One of the most used widget for design is the Scaffold widget.
Widget build(BuildContext context) {
 return Scaffold(
   appBar: AppBar(
    title: Text('First Flutter Application'),
    ),
    body: Stack(
        children: [
            ElevatedButton(
                    child: const Text('Take survey'),
                    onPressed: () {
                      Get.to(const QuizScreen());
                    },
                  )
                      ]
            )
}
This creates a simple screen with an app bar at top. The Stack used in the body is used to create a top down hierarchical structure. The elevated button is a simple button which on pressed get's to the next screen.
Text Field Design and radio box
The name and age details are obtained from the user by using a input field and gender is selected by using a radio box.
final nameController = TextEditingController();
 @override
  Widget build(BuildContext context) {
  return Scaffold(
      body: TextField(
                    controller: nameController,
                    decoration: InputDecoration(
                      filled: true,
                      fillColor: Color(0xFF1C2341),
                      hintText: "Name",
                      border: OutlineInputBorder(
                        borderRadius: BorderRadius.all(Radius.circular(12)),
                      ),
                    ),
                    cursorColor: Color.fromRGBO(23, 200, 123, 1),
                    style: TextStyle(
                        color: Colors.white
                    ),
                 ),
          Row(
                 children: [
                    Radio(value: "Male", groupValue: gender, onChanged: (value){
                      setState(() {
                       gender = value.toString();
                       });
                     }),
                    const Text(
                      'Male',
                      style: TextStyle(fontSize: 16.0,color: Colors.white),
                     ),
                    Radio(value: "Female", groupValue: gender, onChanged: (value){
                      setState(() {
                        gender = value.toString();
                        });
                      }),
         )
}
The controller is defined outside the build function and is used to get values from the text field. The decoration is used to add styles to the input text box and text style can be used to style the text typed by user.
A radio button is created and styled in the similar approach. It is used inside a row widget to align them horizontally. The setstate is used to get store the value to gender variable for further access. The welcome page will look like this.
UI for Quiz Screen
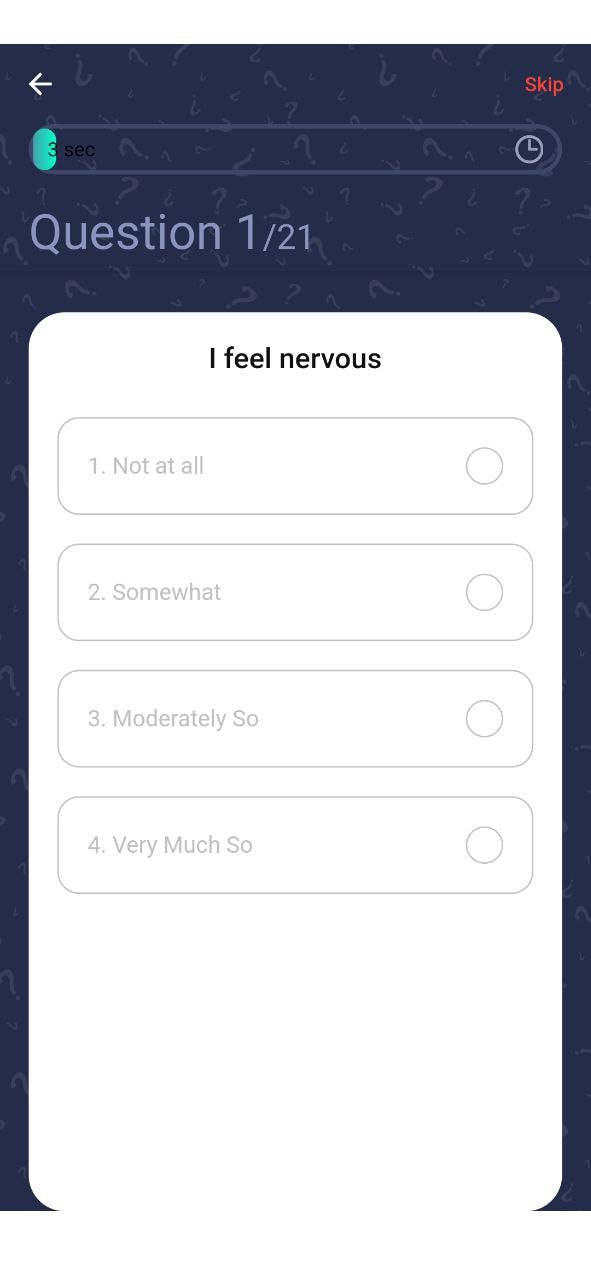
The quiz screen has progress bar to measure time and skips to next question when the time is completed. When a user select a option, the options turns green color and automatically move to next question. There is also a skip button to skip the question.
A layout builder is used
LayoutBuilder(
                builder: (context, constraints) => Container(
                  width: constraints.maxWidth * controller.animation.value,
                  decoration: BoxDecoration(
                    gradient: kPrimaryGradient,
                    borderRadius: BorderRadius.circular(50),
                  ),
                ),
              ),
The width is found and updated regularly to make a moving effect. The controller used comes from The Quizcontroller class using getbuilder method.
GetBuilder<QuestionController>(
       init: QuestionController(),
       builder: (controller) {}
)
The GetBuilder is a get function which can be used to make any widget interactive. We use this to listen for the the event of animation and to normalize the speed and length of progress bar using controller.animation.value. The QuestionController class uses the update() method to make changes with respect to event
  void onInit() {
    _animationController =
        AnimationController(duration: Duration(seconds: 60), vsync: this);
    _animation = Tween<double>(begin: 0, end: 1).animate(_animationController)
      ..addListener(() {
        update();
      });
This onInit() method replaces the initState() method of stateful widget. The animation controller is used. The Tween class is used to extend the animation to other datatypes to specify the range. As we see in the above code, controller.animation.value is has a value between begin and end. vsync is used to specify the parents. The animate function calls the animation.
Closing Thoughts
Flutter may be a little complex for beginner, but it has the best UI framework and try to learn by splitting the app into different components like this blog😁. If you want more reference, feel free to check it out here.